How-to: Design, build, and configure a (low-cost!) Backup/Server Monster
April 5, 2006
My company needed about 1 terabyte of backup storage space. We use software that keeps every file that has been changed or created (incremental backups + sessions for all you geeks). This requires about 400GBs of storage for every 100GBs of data the company uses if we want to be able to keep one years worth of files (milage will vary depending on how many files are changed, and the size of the files). We built a system that can store
two years of changes to every file ever created easily! Unfortunately, the problem with this is (of course) that if we get incriminating emails, and then they "mysteriously disappear," it doesn't look too good for us.
The Project
So here's how the project went down. We built a full-fledged server, installed Fedora Core 4 (not 5! waaaay to bleeding-edge), setup the server to serve the 4 backup hard drives (broken-up into 2 RAIDO arrays) through FTP (the protocol our software uses), and as a bonus we setup a 5th drive (smaller) to hold the OS, software programs, and a shared folder for generic files. The fifth drive was shared through SAMBA (so it could be accessed from Mac/Windows/Linux). Because we had a fairly fast CPU and we were (believe it or not!) tight on cash, we used software RAID0.
You can download the four Fedora Core 4 CDs (for 32-bit Intel/AMD CPUs)
here
Build THE MACHINE
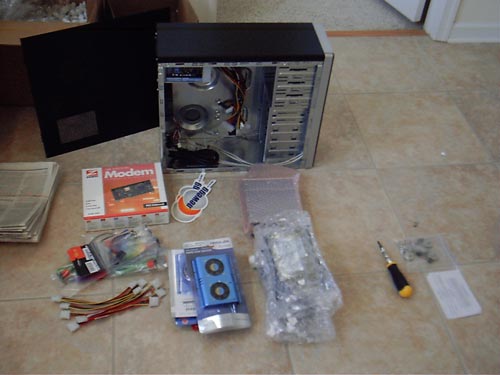
All of the parts from our initial parts order for our backup system. We never used that pile of hard drive fans.
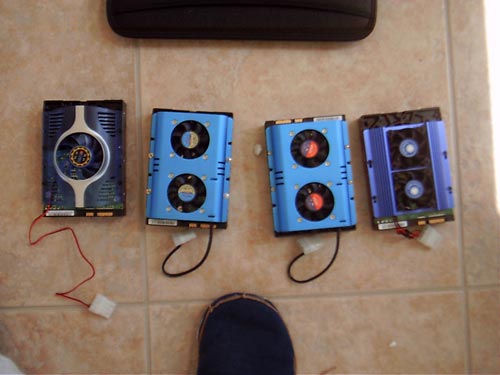
The four 250GB hard drives suited-up and ready for battle installation. We ended-up having to remove the fans.
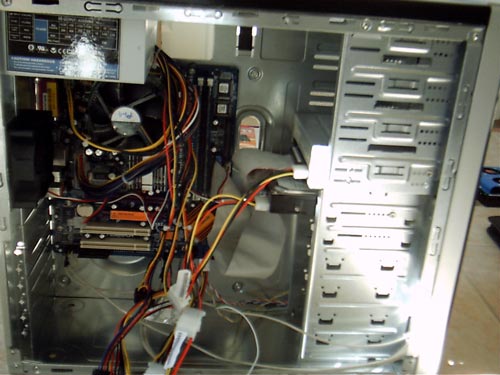
Our case with everything installed except the four 250GB hard drives.
We had a not-so-old memory/motherboard/CPU pair (Intel Celeron 2.66 GHz, way faster than this project needed) that was scavenged for this backup monster. So we had to buy the case, 5 hard drives, cables, more cables, some more cables, extra backup cables, and some fans. A few of the cables we bought were not used. Here is our complete part list (with notes, minus the parts that we did not use):
You will also need a mouse, keyboard, and monitor for the configuration of the backup machine. You can disconnect them later when your done configuring everything.
The case we used required that we install the 80mm fan
before we put in the hard drives (because the fan goes on the inside of the front panel). We figured that out after we had installed all of our five hard drives. Don't make that mistake.
Do not use hard drive fans. We had a serious probable with our case because it had set positions were you had to put a hard drive (metal tabs along the hard drive rows), so the extra width the fan put on the hard drive raised the hard drive above the screw holes. We had to dump the hard drive fan idea. So either get a case without defined positions to put the hard drives, or don't use hard drive fans!
Install Fedora Core 4
Basic install notes:
I recommend creating a "server" user. Because this backup machine should really only be accessible locally, you might as well make the root user have the same password as the server user.
Hard drive setup:
During the Fedora Installation select "Custom Install." Then when it asks about partitioning, use "Disk Druid."
Setup one RAID0 (you
must read the
definition so you know what your doing) using two of your 250GB drives.
Then setup another RAID0 using the other two 250GB drives.
For your fifth smaller drive, just format it as "/"
Use the "ext3" file system on everything.
We made the firt RAID0 /dev/md0 and mounted it as /backup1
I bet you can guess how we setup the second RAID0!
/dev/md1 and /backup2
Incase you can't figure it out, here is how you setup a RAID0 device using Disk Druid. You can
read full Disk Druid documentation here. Basically, to setup one RAID0 (the first one) fill the first 250GB drive with a "raid partition" and fill the second 250GB drive another "raid partition." Then make both of your "raid partitions" one RAID0 array.
Here are the default software programs that we installed:
X Window System
GNOME Desktop Environment
Editors
Graphical Internet
Office/Productivity
evince
Sound and Video
mkisofs
cdrecord
Server Configuration Tools
Web Server
mod_perl
php
mod_ssl
mod_auth_mysql
distcache
php-odbc
php-pgsql
crpto-utils
mod_python
webalizer
squid
php-ldap
tux
httpd-manual
php-mysql
Mail Server
spamassassin
dovecot
Windows File Server
DNS Name Server
FTP Server
PostgreSQL Database
unixODBC
MySQL Database
All but qt-MySQL, mysql-bench, and qtODBC
Network Servers
vnc-server
Development Tools
Standard Config
Administration Tools
System Tools
Standard Config
Ohh, and because we know your so interested, here is what our hard drive situation looks like:
| /backup1 | /dev/md0 | ext3 | RAID0 |
| /backup2 | /dev/md1 | ext3 | RAID0
|
| / | /dev/hdb1 | ext3 |
| /Repository | (on / ) | (this is just a folder we created on "/" Don't worry about making it a partition or anything) |
After you have installed Fedora setup the "server" user to login automatically after 5 seconds :
From within the GNOME desktop click "Desktop > System Settings > Login Screen"
Setup FTP
Setup vsftpd (the FTP server) to start at boot-up:
When in the GNOME desktop, click "Desktop > System Settings > Server Settings > Services"
Then scroll down to the bottom of the list and click the checkbox next to vsftpd. This enables it to startup on boot-up.
Use
this website to configure vsftpd.
Here is the part of that website that you really only need (the location of the files have been changed because Fedora Core 4 uses different names than the guide):
Step
4: The vsftpd master configuration file
The master vsftp configuration
should be located at /etc/vsftpd/vsftpd.conf. This file is going to determine
how your vsftpd FTP server operates. You will find that the vsftpd.conf
file contains loads of configuration options. I'm not going to cover every
single option, but the most important ones are listed here:
anonymous_enable=NO/YES
Turns on or off anonymous
FTP access. If you turn it on, the anonymous server config info outlined
in step 3 of this install will apply. If you are unsure about what an
anonymous FTP server is, it's best to set this option to "NO".
local_enable=NO/YES
This options activates
or deactivated the ability of local system users to be able to FTP to
your server. Typical FTP servers will have this option set to "YES".
The only time I can think of a "NO" situation would be for an
strictly anonymous FTP server where you have no need to systemic user
FTP sessions.
write_enable=NO/YES
Activates or deactivates
FTP write ability. In most cases, you will want this set to "YES".
local_umask=022
(or whatever you want it to be)
The default vsftpd
umask is 077. Here you can establish a custom umask if you so desire.
xferlog_enable=YES
This options activates
logging of uploads & downloads.
ftpd_banner=Welcome
to blah FTP service
Not a critical option
in any way, but it does allow you to have friendly, customizes ftp greetings
for your users.
chroot_list_enable=NO/YES
chroot_list_file=/etc/vsftpd.chroot_list
This rather important
and usefull option enables the "chroot" abilities of vsftpd.
With "chroot_list_enable" set to "YES", vsftpd then
looks for a "chroot_list_file" whose location is specified on
the next line. Any user that is listed in the "/etc/chroot_list"
file is then automatically "chrooted" to their home directory.
This prohibits the user from going anywhere outside of his/her FTP home
directory. Very useful in shared FTP environments or just a a general
layer of security and privacy.
userlist_enable=NO/YES
userlist_deny=NO/YES
The "userlist_enable"
option instructs vsftpd to either consult or not consult either of 2 files:
vsftpd.ftpusers and user_list. If this option is set to "YES",
the 2 files serve as lists of users that are allowed to FTP to the server.
However, when coupled with the "userlist_deny=YES"" option,
the 2 files serve as list of users who are NOT allowed to FTP to the server.
This option is very useful in completely denying FTP access to critical
system users such as "root" or "apache" or "www".
A very nice layer of security for your FTP server.
Step
5: The ftpusers, user_list configuration files
These 2 files tie
directly into the "userlist_enable" and "userlist_deny"
options in the /etc/vsftpd/vsftpd.conf config file. When the "userlist_enable"
option is set to "YES", these 2 files serve as lists of users
that are allowed the FTP the the server. However, when coupled with the
"userlist_deny=YES"" option, the 2 files serve as list
of users who are NOT allowed to FTP to the server. When the "userlist_deny"
option is used, the nature of the denial of FTP service that a prohibited
user received differs depending on which of the 2 files they are listed
in.
If a user is listed
in the "user_list" file and the "userlist_deny"
option is activated, users will not even get prompted for a password when
they attemp to ftp to the server. They get rejected from the start.
If a user is listed
in the "ftpusers" file and the "userlist_deny"
option is activated, users will get prompted for a password but will neer
be able to log in.
Personally,
I like to use the "vsftpd.user_list" configuration to establish
a list of users (root, apache, www, nobody etc.) who will never even get
prompted for a password should an ftp connection be initiated on their
behalf.
Step
6: The vsftpd.chroot_list configuration file
The "vsfrtpd.chroot_list"
file, when used with an activated "chroot_list_enable" option,
establishes a list of FTP users who will be "chrooted" to the
home FTP directory. These users will not be able to change directories
past their own home directory. This is a nice feature in shared FTP environments
where privacy is needed.
Anytime
you make config file changes, make sure you restart vsftpd!
That's it. There are
a host of other config options that you can add if you so desire, but
by and large at this point you should have a secure and functional FTP
server.
Fedora Core 4 is set to NOT allow people in ftpusers and user_list to connect. Remove the "root" entry from these two files, because you want to be able to FTP using the root user and password (because you will be accessing root directories). This (as far as we can tell) is not a security risk because your server
should only be accessible locally.
Backing-up
Once you have your FTP server running all you need to do is tell your backup software to use your FTP server as its destination. Your FTP's info is:
Server: [servers-IP-address]
Login: root (we use root because we are accessing low-level files via FTP)
Password: [roots-password]
Our backup software requires that after a hard drive fills up you delete the entire backup-set on that hard drive (you can't just delete certain sessions). Normally during the period that you have deleted a backup set and the backup software is creating a new backup set (backing up your files "for the first time") you are vulnerable to data loss because you don't have any functional backups. We got around this situation by doing this:
1. Create and use a backup set one on /backup1
2. Mirror /backup1 and /backup2 until backup set one fills up.
3. Stop mirroring when backup set one fills up.
4. Recycle backup set one.
5. When backup set one fills up again, recycle the old mirror of backup set one located on /backup2 and use it as backup set two. When backup set two fills up repeat steps 4 and 5.
Hopefully that made sense to you. If you use software like ours it probably did.
Setup SAMBA
The fifth hard drive in our backup system has a folder located at /Repository. You can create this folder by typing
"sudo mkdir /Repository" at the command line.
This folder is shared across the network using SAMBA (Windows file sharing). Windows file sharing is good for Linux, Mac, and (of course) Windows systems.
The /Repository folder holds network-shared music and photos.
Very cool tip:
If you create a "Music" folder in the /Repository folder and copy your "iTunes" music folder (on Mac) to your newly-created /Repository/Music and then replace your local copy of "iTunes" with a alias pointing to the shared "/Repository/Music/iTunes" (by creating an alias of the folder while "/Repository/" is mounted via SAMBA and moving the folder into your home folder) whenever you start iTunes it automounts the "/Repository/Music" directory!
Now here is how to setup SAMBA:
In the GNOME desktop click "Desktop > System Settings > Server Settings > Samba"
Using the interface setup /Repository/ as a shared "share." I recommend making it visible and writable and making it accessible by all users.
Mac tip:
Here is how to connect to your /Repository/ via Mac:
In the Finder click "Go > Connect to Server" and for server enter:
smb://[your server's IP-address]/
You might want to make your IP address static. Really. It might just make your life easier. You can usually setup a static IP address in your routers web configuration frontend.
Setup System Monitoring
If you want to be able to track your system's status and hard drive status, there are a few utilities that can help you. Our backup monster (and file server) is running all of these things.
Zabbix:
Setup basic Zabbix using
this guide. Do not follow the part about "edit /etc/apache/httpd.conf." Just put the web frontend in
/var/www/html/zabbix
Some notes on Zabbix:
You can access your zabbix web frontend on any computer on your network bu entering into a browser your backup machine's IP address and then "/zabbix"
Here is the way we have the auto-start of zabbix setup:
In the GNOME desktop click "Desktop > Preferences > More Preferences > Sessions"
Once you are there click "Startup Programs"
Add these commands as startup programs:
Order: 1 command: "zabbix_server" (without quotes)


	Order: 49 command: "rm -r -f /var/tmp/zabbix_agentd.pid" (without quotes)


	Order: 50 command: "zabbix_agentd" (you guessed it, without quotes)


	Order: 100 command: "/usr/sbin/zabbix_suckerd" (must I really say it?)
Zabbix documentation is very interesting. It is very well written, but it doesn't really explain
how to do anything. Here are some basic things you might want to do in Zabbix. For everything else, you will have to read
the docs.
Here is how to setup email alerts:
(from
here)
1. In the Zabbix web interface setup a media type. Click "Configuration" then "General" and go through the setup.
2. Click "Actions" from within "Configuration." Set-up an action.
I had not been able to get the backup machine to send email to foreign servers (AKA Comcast, AOL, etc). So I setup my email client to ask the server for local email. This means that when you are setting up email alerts, have them go to server@localhost
read the "Configuring Your POP Mail Server" section of
this guide to setup email.
All you really need to do is go into "Desktop > System Settings > Server Settings > Services" when in the GNOME desktop and click the "dovecot" checkbox in the list on the left. This will enable the POP3 (secure/non-secure) and IMAP (secure/non-secure) server to start at boot-up.
In an email client on a computer located on your network setup an account with this info:
POP3 Server: [your-backup-machines-IP]
Username: server
Password: [servers-password]
Making Your Monster SMART
This guide here should tell you everything you need to know about setting-up SMART status checking of the hard drives in your backup system. It is very easy, but unfortunately you can't check the status of the drives in your RAID0 arrays. DRAG!
Final Notes
Your "backup machine" at this point is performing all of its basic functions perfectly. But the CPU in this machine is still barely working! You can do much more. If you put a "index.html" file in /var/www/html it will come up if you put your systems IP address into a web browser. We have our system serve a webpage with links to Zabbix and some other utilities.
You can even use your system to run the open-source
Asterisk PBX software. Asterisk is known for barely using any CPU cycles.
Once you get all your configuration done you should be able to literally unplug the display cable from your "backup machine" (we actually call it our "control center") and have it run "headless." You might want to enable some sort of "reboot on power loss" feature in your system's BIOS before you unplug the display.
Congratulations
Congratulations! You have just built a 1 terabyte "backup machine." Hopefully you have learned something along the way. You probably realized that with all of the power a generic CPU gives you your "backup machine" can do much more then just make your hard drives available through FTP. You can have your backup machine serve a website, serve music and photos, we even plan on using ours to act as a fax server. Feel free to
email us with any questions.